Wednesday, August 4, 2010

Page 1: Peek A Boo

Here's the first page I made, I got my inspiration from here.


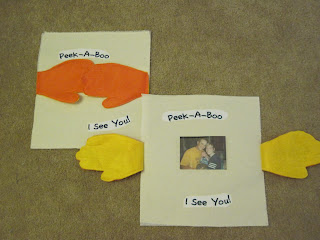
Here's the Peek-A-Boo page!! 

Closed & Open


Not sure why I chose Orange and Yellow-- but why not?? :) 
Oh, and the picture is removable- so that it can be replaced as the kid/family grows! :) That way there can always be a current picture in there. I just used a page protector, cut it down to size (~3x5in) and zig-zagged it to the muslin. I used the material you can put through an ink-jet printer to do the lettering and then just cut out the titles and sewed them on. I don't really trust my handwriting to put directly on the muslin!

One page down.... lots more to go!!

Page Bases

The pages are made of muslin with a fusible pellon on the back to make them sturdy. I only ironed one to the ironing board... ha ha! Instructions for the pages are here.

Ready.... Sew! (The Cover)

So, the first things that are sewn in the project were the handles and closures for the book-- not as easy as it sounds. :) My material is fairly thick, and on top of that they have fleece adhered to their backsides... and that makes them down right fat when you have to fold them in 1/2 to sew!! So, this was a true test of my brand-new machine, my patience, and Wade's patience! :) As ypu can see in the picture, he's sewing one of the handles--- and is doing a splendid job! (if you look closely at the handles- pick out the 2 that have the straightest stitching... and they are bound to be the two he sewed!!)


The next thing that she suggests is to sew a pocket and then sew it on the outside of the cover... and I figured I would throw in one of the 58 decorative stitches that this machine has... I think it turned out pretty good!


Here's the pocket all sewed on- which was a trick to figure out for the first one, but I had my rocket scientist on hand to figure it out for me, so the second one went pretty smoothly! :)


Next came the handles and closure... if I thought the handles were thick to sew through... try sewing through the handles and the fusible fleece... but the machine did it without a hitch! Go new machine!! :) (The striped material is the inside of the cover)


Here's my completed cover (outside)-- had to stitch the two sides together, turn it, and try and figure out how to stitch up the hole I left to turn it... that was entertaining.. but maybe I learned how to do it... maybe.


Ignore the messy island above-- but I was just showing the inside/outside of the cover. All I have left is to figure out how to use "close" the book. I was thinking velcro... but ended up buying those overall-buckle things (don't know their name) and they seem to work, sorry -- no pictures yet!!


Next up... pages! :)


Getting ready to sew...

So, after wondering around Joann Fabric for about 30 minutes, I finally decided on material for the cover of the book, denim, and another cool striped print for the inside. I already knew I needed to get muslin for the pages, so I did that-- here's a few pictures of my materials.

I got 3 yards of each- denim, the striped material for the inside of the cover, and fusible fleece. I had some left-overs of everything (this is for 2 books).

Then I cut out all the pieces of my cover--


I followed these instructions to make the cover.

Amazing to think that in just a little while from the time this picture was taken I had constructed something... which I hope will be useful! :)


After fusing the fleece to the back of the striped material- I was ready to sew!!

Quiet Books for my new nephews

So, I got this BRAINY idea that I should make quiet books for my nephews for Christmas. Quiet books are those cloth books that you often see young kids looking at/playing with during church. But they can be used for any time that you need them to be quiet.

The funny part of all of this is that I do not sew. Well, at least that was true up until a week ago when my new sewing machine arrived at my door!

Here's my new machine. I have been really happy with it since I got it last Thursday. :) It hasn't been too hard to figure out, and that is a major plus! Here's a fun story about it, I ordered it Wednesday morning from Amazon. It arrived at my house on Thursday morning. And no, I did not pay to upgrade shipping, in fact, I qualified for free shipping. Luckily for me, it came from Goodyear... who knew?! :)

Here's Wade showing me how to sew a straight seam... not sure that that particular lesson has "stuck" quite yet. But I am doing better. :)